
Vue入門の第14回(第1回はこちら)です。今回は、受け取ったpropsをコンポーネント内でcomputed処理して利用する方法を学びます。
index.htmlを書き換える
前回作成したHTMLファイル index.html を以下のように書き換えます。
<!DOCTYPE html>
<html lang="ja">
<head>
    <meta charset="UTF-8">
    <title>Vueサンプル</title>
    <script src="https://unpkg.com/vue"></script>
</head>
<body>
<div id="app">
    <item catchcopy="再入荷しました!" pointup="true"></item>
    <item></item>
    <item></item>
</div>
<script src="main.js"></script>
</body>
</html>前回の書き換えでは、3つある<item></item>のひとつに「catchcopy=”再入荷しました!”」というカスタム属性を追加しました。今回の書き換えでも同じように「pointup=”true”」というカスタム属性を追加します。
このカスタム属性 pointup の値を、itemコンポーネントにpropsとして受け渡します。
main.jsを書き換える
前回作成したJSファイルmain.jsを以下のように書き換えます。
Vue.component('item', {
    props: {
        catchcopy: {
            type: String,
            default: '定番商品'
        },
        pointup: {
            type: Boolean,
            default: false,
            required: true
        }
    },
    template: `
        <div class="item">
            <div class="item-image">
                <img v-bind:src="itemImage" />
            </div>

            <div class="item-info">
                <h2>{{ itemFullName }}</h2>
                <ul><li v-for="itemInfo in itemInfos">{{ itemInfo }}</li></ul>
                <p>※{{ catchcopy }}</p>
                <p>※ポイント付与率:{{ pointRate }}%</p>
                <p v-if="zaiko > 2">在庫あり</p>
                <p v-else-if="zaiko <= 2 && zaiko > 0">残りわずか!</p>
                <p v-else>在庫なし</p>

                <div
                v-for="itemColor in itemColors"
                v-on:click="changeColor(itemColor.cImage, itemColor.cName)"
                v-bind:style="{ backgroundColor: itemColor.cCode }"
                style="width:30px; height:30px; margin-bottom:20px;"
                >
                </div>

                <button
                v-on:click="addCart"
                v-bind:disabled="soldout"
                >買い物かごの中身を増やす</button>
                <div class="cart">
                    <p>買い物かごの中身 {{ cart }}</p>
                </div>
            </div>
        </div>
    `,
    data() {
        return {
            itemName: 'キッズ靴下',
            itemColorName: 'ピンク',
            itemImage: './images/socks-pink.png',
            itemInfos: ["子供向け靴下", "コットン100%", "人気商品!"],
            itemColors: [
                {cName:"ピンク", cCode:"#ee6699", cImage:"./images/socks-pink.png"},
                {cName:"ブルー", cCode:"#33aaee", cImage:"./images/socks-blue.png"}
            ],
            zaiko: 5,
            cart: 0,
            soldout: false
        }
    },
    methods: {
        addCart: function () {
            this.cart += 1
            this.zaiko -= 1
            if (this.zaiko <= 0) {this.soldout = true}
        },
        changeColor (cImage, cName) {
            this.itemImage = cImage,
            this.itemColorName = cName
        }
    },
    computed: {
        itemFullName() {
            return this.itemName + '(' + this.itemColorName + ')'
        },
        pointRate() {
            if (this.pointup) {
                return 2
            } else {
                return 1
            }
        }
    }
})

var app = new Vue({
    el: '#app'
})
今回のmain.jsの書き換えでは、以下の3点が変更されています。
- propsプロパティのなかにpointupというpropの指定が追加されています。
- computedプロパティのなかに、pointRate()が追加されています。
- templateプロパティのなかに <p>※ポイント付与率:{{ pointRate }}%</p> の一行が追加されています。
表示を確認してみる
ここまで出来たら、index.htmlとmain.jsを上書き保存して表示を確認してみましょう。以下は、今回作成したサンプルページです。
https://programming-world.net/sample/vue_sample/14/index.html
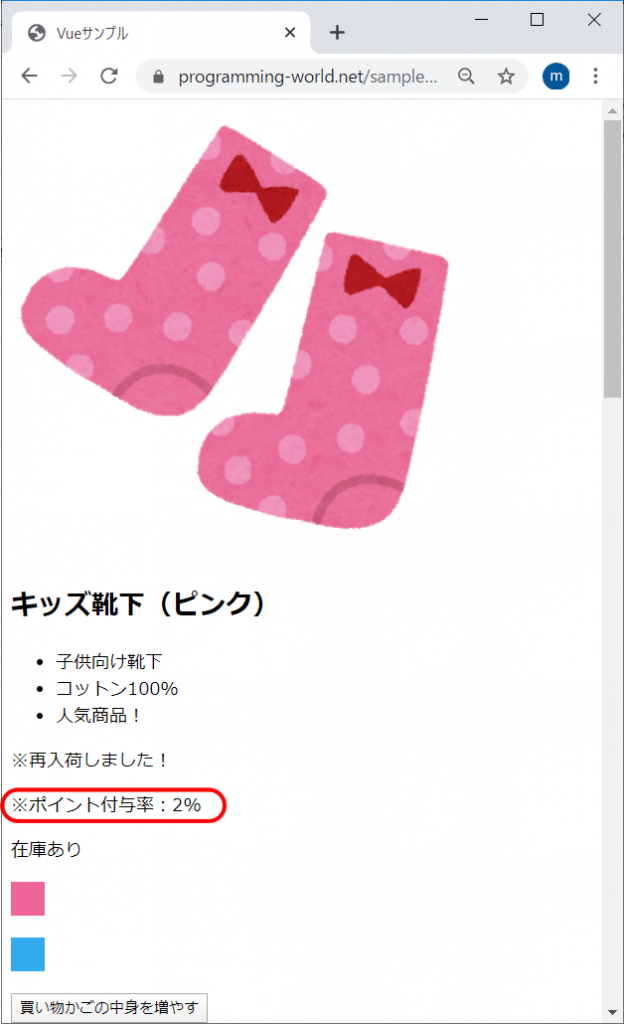
<item catchcopy=”再入荷しました!” pointup=”true”></item> と指定したitemコンポーネントで、「※ポイント付与率:2%」が表示されれば成功です。
<item></item> とだけ指定した2つのitemコンポーネントでは、 「※ポイント付与率:1%」と表示されているはずです。
今回の変更点を詳しく確認
あらためて今回の変更点を詳しく確認していきましょう。今回のmain.jsの書き換えでは、以下の3点が変更されています。
- propsプロパティのなかにpointupというpropの指定が追加されています。
- computedプロパティのなかに、pointRate()が追加されています。
- templateプロパティのなかに <p>※ポイント付与率:{{ pointRate }}%</p> の一行が追加されています。
1. propsプロパティのなかに pointup を追加
1点目の変更では、propsプロパティのなかにpointupという名前を付けたpropの指定が追加されています。
    props: {
        catchcopy: {
            type: String,
            default: '定番商品'
        },
        pointup: {
            type: Boolean,
            default: false,
            required: true
        }
    },
上記コードでは、pointupという名前を付けたpropは、タイプはBoolean型、初期値は false 、必須かどうかは true と指定しています。
2. computedプロパティのなかに pointRate() を追加
2点目の変更では、computedプロパティのなかに pointRate() が追加されています。
    computed: {
        itemFullName() {
            return this.itemName + '(' + this.itemColorName + ')'
        },
        pointRate() {
            if (this.pointup) {
                return 2
            } else {
                return 1
            }
        }
    }
上記コードでは、コンポーネントに渡された pointup という名前の prop を「this.pointup」で受け取って利用しています。 this.pointup の値がtrueなら2を返し、falseなら1を返しています。
templateプロパティのなかにポイント付与率を表示するp要素を追加
3点目の変更では、templateプロパティのなかに <p>※ポイント付与率:{{ pointRate }}%</p> の一行が追加されています。
template: `
    (中略)
    <p>※ポイント付与率:{{ pointRate }}%</p>
    (中略)
`,
上記コードでは、ここでは、computedプロパティのなかのpointRate()で計算した結果をp要素として画面に表示しています。
まとめ
今回は、受け取ったpropsをコンポーネント内でcomputed処理して利用しました。
- props のタイプには、前回登場したString型以外に、今回登場したBoolean型があります。 Boolean型は true / false を値に持ちます。
- 受け取ったpropsは「this.pointup」という具合にthis.props名で指定できます。「このコンポーネント内のpointupの値」という意味です。
次回へ続きます。